Filling water
The easiest way is to put water in the rocket first and then place this one on the ramp, but there it gets complicated since the simple turning the bottle over to place it on the ramp, will cause loss of water. The only viable solution is to put the rocket at upside down (as if to fill it), overturn the pitcher and put it on the rocket. Then straighten everything up and put everything back in device.
It's a bit heavy (both literally and figuratively), so the function of filling on a ramp quickly becomes essential.
This function is easy to perform if we have a water pipe under pressure nearby. Indeed, the water distributed is at a pressure greater than 4 bars, which is sufficient.
But if this pressurized water is not available, the problem is a little more difficult insofar as when the rocket is filled with water, the air pressure increases in the bottle (The volume that is allocated decreases while the amount of air is the same). So either we manages to let the air escape (but not the water), either we send pressurized water.
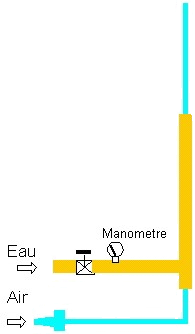
To let the air escape, we can play on the fact that the bottle never being filled with water, so we can put a double tube as shown in the diagram opposite.
But this solution is quite complicated to achieve, moreover it does not not easily to launch bottles of different volumes.
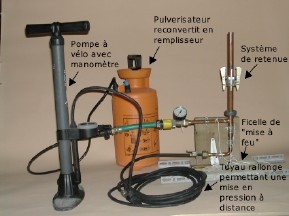
To bring the water under pressure, all you have to do is use a garden sprayer. It is a tank in which we put water, then pressurized using a built-in hand pump. A hose comes out at the end of which is a trigger then a thread normally intended for screwing in a spray lance. Simply replace this lance with a piece of garden hose fitted with one side a screw connection compatible with that of the sprayer and the other a garden hose quick connector to connect to the launcher.
below is a complete launch pad with the "launcher", the pump bicycle and its extension hose, the garden sprayer for water filling.
More sophisticated: the system with precise water dosage.
Most of the time, rockets are made from plastic bottles transparent, the dosage of water is quite easy and is done "visually". But it is still approximate. You can graduate your rocket in volume by putting, for example, 100ml of water in a graduated container, then by turning the bottle over after having corked it, we can put a line on the bottle which corresponds to 100ml. We add again 100 ml and we put a line for 200ml, and so on. However even in in this case, when the pressure was put on, the water that had remained in the pipes, will be propelled into the bottle thus increasing the volume of water on board.
To make a precise dosage, it is then advisable to use a reservoir buffer in which we will put the desired volume, then we transfer the water contained in this tank, towards the rocket. Here is the block diagram:
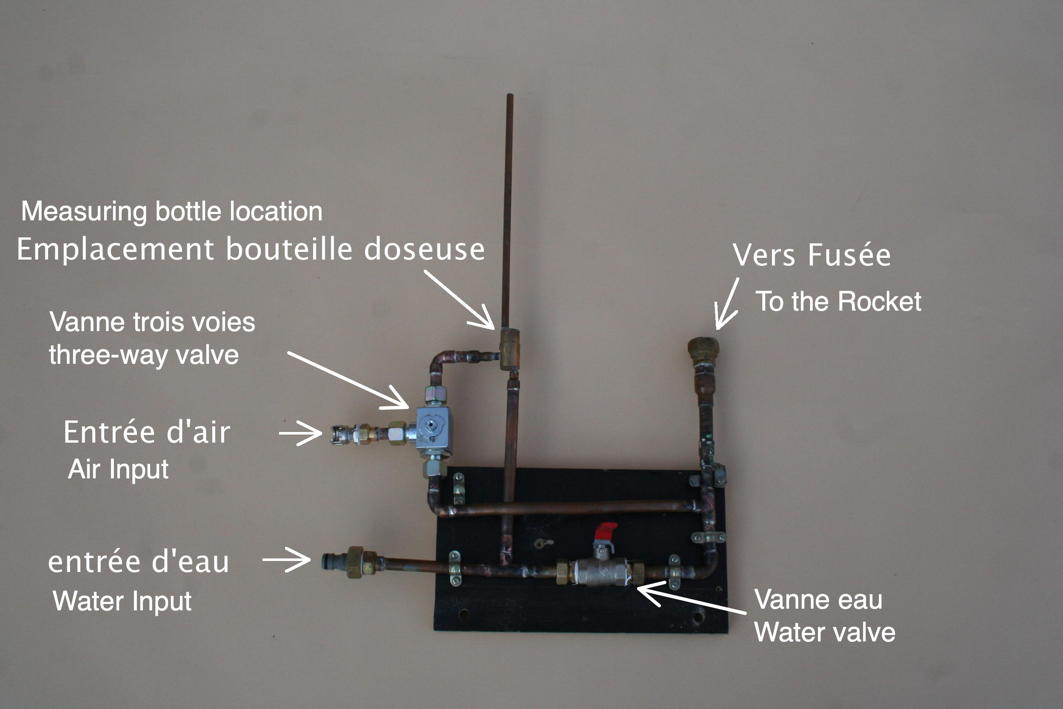
To put the amount of water desired, we close the water valve and We put the 3-way valve towards the metering bottle. This bottle dosing must of course be graduated.
Once the amount of water starts, we open the water valve and give a few pump shots so that the pressure in the metering bottle is greater than that of the rocket. The water then passes from the metering bottle in the rocket.
We closes the water valve and the 3-way valve is switched to put the pressure in the rocket


