It is in fact the "engine" of the rocket since in principle, a water rocket takes its energy from the compressed gas in its tank. This one must, therefore, of course, withstand the pressure that one wants to put on it.
As we saw in the Matérials page, PET bottles for carbonated drinks are widely used as a reservoir. But, currently, we only find bottles of 2 liters maximum, so if we want to achieve more efficient rockets, we will have to find other solutions.
To have more efficient rockets, it is necessary to increase the stored energy, therefore to increase either the volume of gas, or the pressure, or even both.
To increase the volume, one can imagine assembling several bottles to obtain a larger volume. We will see this further.
To increase the pressure, you will need to use a tank capable of holding the pressure you want to put there. Remember that an impeccable PET bottle can hold up to 10 bars. Beyond that we take serious risks, even if we know that they explode around 13 bars.
Finally, we will see that there is another material which makes it possible to make interesting reservoirs. But let's start from the beginning.
Simple body
By simple body is meant a reservoir formed by a single bottle. This must be free of any crease, scratch or shock marks. There are different capacities, the most common being: 0.5l, 1l (be careful with the diameter of the neck), 1.25l (sparkling water bottles), 1.5l (the most common) and 2l.
On this body itself, there is not much to do except remove the label. It is not essential, but it can only improve performance (lower weight and better Cx). Depending on the brand of drinks, the glues used are sometimes difficult to remove. First remove as much paper as possible, moistening it and without using any tools that could damage the bottle, then remove the glue using White Spirit. Once all the glue is removed, wash with soapy water and then rinse the bottle.
It is also possible to reform the bottom of the bottle to give it a more aerodynamic shape. To do this, pressurize the bottle to about 3 bars, heat the bottom, with a hair dryer or a heat gun for example, distributing the heat well and keeping the device at about 20 cm from the bottle. The plastic will soften and by the internal pressure, the bottom of the bottle will take a spherical shape. Plan a few unsuccessful attempts before succeeding in this manipulation!
Multi-bottle body
A multi-bottle body consists of several cylinders placed end to end to increase the volume of water and compressed gas; without increasing the diameter. There are several coupling possibilities, summarized in the diagram below.
The "head to head" assembly is only justified beyond 2 bottles, since
there is no "nozzle". You therefore need a third bottle (at least)
connected "bottom to bottom" with one of the 2.
 For each of these types of assembly, a way
must be found to fix the bottles together so that it is leaktight even
under pressure.
For each of these types of assembly, a way
must be found to fix the bottles together so that it is leaktight even
under pressure.
The bottles can be connected by means of threaded tubes of the kind found for bedside lamps.
When using the bottom of the bottle, it will be in your interest to reform it to round it off, as indicated above.
When using the head of the bottle, it will be fitted with its cap.
It will then be necessary to drill a 10 mm hole in the center of the bottom of the bottle or in the center of its stopper.
In the head-to-head coupling, the assembly is easy, since it suffices to join 2 plugs together, we place a nut at one end of the threaded tube, we put the gasket. We thread everything through the hole of the first plug (nut inside the plug), we put the second plug, then the gasket and finally the nut. You serve the whole thing and you can aim the bottles on their cap.
In the Head-to-bottom coupling, place the nut and the gasket on the threaded tube, then put the assembly on a stick 8 mm in diameter and 40 cm in length at least to be able to put the assembly threaded tube, nut and seal from the inside of the bottle. Then place the metal washer then the cap of the second bottle, then put the gasket and the nut and tighten everything.
The realization of the bottom to bottom coupling is more sporty. Start as above by putting a threaded tube assembly, gasket nut through the inside of the first bottle then put a metal washer and a nut that will be tightened well. Replace a nut, a metal washer and then the second bottle. So far all is well, now we'll have to put the gasket and nut inside the second bottle. For this it will be necessary to build a tool consisting of a tube (copper for example) with an internal diameter of 10 mm, through which a tube or round with an external diameter of 10 mm is passed. We then place the nut on the round and we tape it to the outer tube (be careful not to put adhesive tape on the side that will tighten, otherwise we will not be able to remove it), we then put the seal above the nut. We introduce everything through the neck of the second bottle and try to put the seal and the nut on the threaded tube. It takes a little patience and dexterity, but we can do it. Tighten the nut on the outside of the bottle and remove the tube and round assembly.
These three types of coupling are summarized by the diagrams below:

Finally to finish the body, cut in the middle part of a bottle a cylinder that you will place between the two bottles to ensure continuity of the body of the rocket.
This type of coupling has the merit of being fairly easy to perform and rather reliable as long as you take a little care to achieve it. However, the fact of joining the two tanks by an orifice smaller than the neck of the bottle, makes lose power to the rocket.
To overcome this problem, another technique consists of assembling the bottles upside down but removing them. But this technique is much more complicated and it is not always successful. The bottles are assembled by gluing with a polyurethane adhesive for the building type Sikaflex 11 FC or PL Premium(There are other brands). This type of glue must be used with gloves and outdoors.
Here is the flow of operations:
- Take 2 identical bottles and remove the bottoms
- Take a third bottle and cut a sleeve about 8 cm high in its middle. The end of the day is to cut this sleeve out of a bottle whose diameter is slightly larger than the two previous bottles, since it will cover their junction
- Take an old stove and heat it to a minimum (around 110 ° C) on an electric hob. Place the cut part of one of the two bottles on the pan by turning it. The plastic will then soften and curl up, creating a bead at the bottom of the bottle. This bead will on the one hand increase the bonding surface between the bottles and on the other hand prevent the bottle from wrinkling when the sleeve is slipped over it. Do the same on the second bottle.
- Wipe a little sandpaper inside the sleeve and on the part of the bottles to be glued, then clean these parts well.
- Coat the inner half of the sleeve with polyurethane glue (remember to put on gloves) and slide it onto one of the bottles.
- Put glue on the bead of this first bottle and on the second half of the sleeve, then press the second bottle inside the sleeve.
- Check using an angle iron that the 2 bottles are properly aligned.
- Wipe off the glue that has spilled over and let it dry for at least 24 hours.
After heating on the hotplate, a bead like this is obtained. So that it is quite regular and especially perpendicular to the axis of the bottle, I use a "guide". This guide is made with a little thick cardboard that I rolled up on a bottle inflated to 3 bars. So it makes a cylinder in which a bottle slides easily. I put this guide, with the bottle inside, on the pan and while keeping this guide firmly against the pan, I turn the bottle to have a very homogeneous bead.
Here we have a bottle with its bead and sleeve. This has been sandpapered on the inside.
The sleeve on the bottle. Normally before doing this operation, it is necessary to pass a small stroke of sandpaper on the outside of the bottle as well, then to coat with a thin film of glue the inside of the sleeve on half of its length. Now you can thread the bottle into the sleeve, up to half the height of the latter. But this is not necessarily simple since the inside diameter of the sleeve is less than the outside diameter of the bottle. So we'll have to take it slow so as not to crumple the bottle.
And that's half the job done, the sleeve is glued to one of the bottles. You will now have to put glue on the bead and inside the sleeve, then fit the second bottle prepared in the same way as the first. Make sure that the two beads are in good contact.
It's up to you to imagine other bottle assembly techniques that ensure tightness and pressure resistance and that are nevertheless easy to achieve.
When such an assembly of bottles has been made, it is prudent to do a leak test and pressure resistance. It would be a shame to build a complete rocket only to find out on the launch pad that the tank is leaking. To perform this test, completely fill the water tank, close it with an inflation plug and put a pressure of 1 bar higher than the expected operating pressure. If you want to throw at 5 bar, test the tank at 6 bar.
Why fill the water tank? Simply because the water is incompressible, if the tank gives way under pressure, there will be no explosion. Whereas if there is only air in the tank, when it will give way, the air will relax violently throwing pieces of plastic and especially making a lot of noise which can be very damaging for close ears.
Polycarbonate tubes
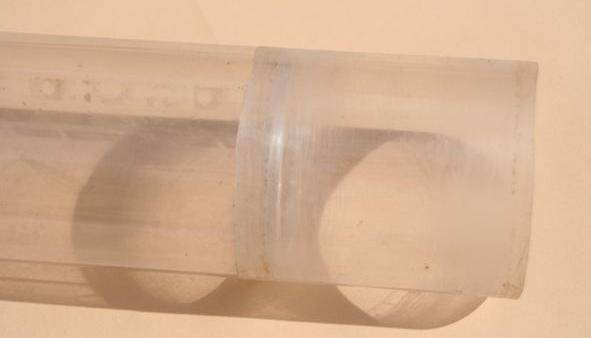
There are in some countries, especially in the USA, very thin polycarbonate tubes (0.4 mm thick) which are placed around the neon tubes to prevent the pieces of glass from falling anywhere in the event of breakage. . These tubes generally referred to as FTC as Fluorescent Tube Cover exist in several sizes, but the most suitable for water rockets are the T12 and T17 which are respectively 42 and 62 mm in diameter. The T12s are available in 2 lengths: 4 and 8 feet, i.e. 1.22m and 2.44m. The T17s are only available in 4 feet.
Whatever the diameter, these tubes are tubes, therefore open at both ends. It will therefore be necessary to put a plug at one end and a nozzle at the other. We can very well put two necks on each side, one will have a plug (ogive side) and the other not (nozzle). I have experimented with several techniques that I give you below:
From the neck of PET bottles
The principle is to cut a bottle in half, one part for the nozzle and the other for the bottom. But no bottle having the diameter of the tubes T12 or T17, they must be "reformed" to adjust them to the diameter of the tube.
Depending on the diameter of the tube, I take either 33 cl bottles (T12 tubes) or 50 cl bottles (T17 tubes).
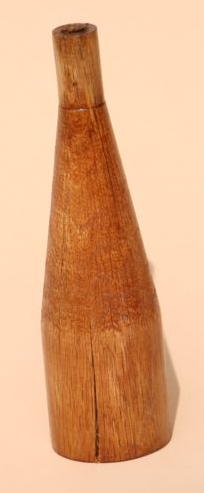
First of all, I made, on a lathe, wooden "mandrels" which allow me to form the bottle to the right size. These chucks consist of three parts:
- a cylinder 21.5 mm in diameter and about 3 to 5 cm long in which the neck of the bottle will slip
- another cylinder 4 to 6 cm long and of a diameter equal to the inside diameter of the tube, minus 2 times the thickness of the plastic of the bottle minus 1/10 or 2/10 mm because when the plastic is withdrawn, this one sees its thickness increase and on the other hand, it is judicious to place a sheet of paper between the mandrel and the bottle to be able to unmold without too much difficulty. On the exact diameter, it will undoubtedly be necessary to make some unsuccessful tests, before arriving at the right dimension. My mandrels are 39.3 mm in diameter for the T12 and 58.6 mm for the T17.
- Between these two cylinders, a conical part, the length of which will depend on the bottle used and the length of its own conical part. In the photo opposite, this mandrel is designed for a T17 tube and a 0.5l Badoit bottle. The cone is 10 cm long.
My favorite bottles for these accomplishments are the Badoit or Quezac bottles, which I just cut up the bottom and use everything else to make one end.
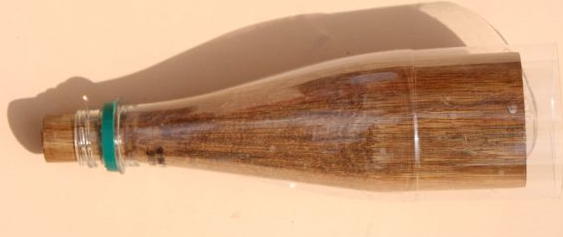
I then position this shrouded bottle on the mandrel, covered at least on the largest cylinder with a sheet of paper. In addition, I place a damp cloth on the neck to avoid deforming it. In the photo opposite, neither the sheet of paper nor the cloth are in place.
After which I heat the bottle using a heat gun, taking care to heat as regularly as possible and keeping the device at least 20 cm from the plastic. When the plastic perfectly matches the larger diameter cylinder, I stop heating and unmold. For this, we see that the mandrel protrudes about 1 cm from the neck. It helps a lot for demoulding, by hitting it with a mallet.
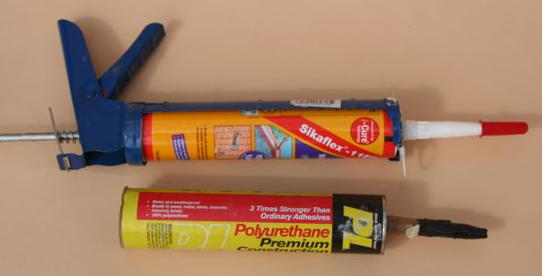
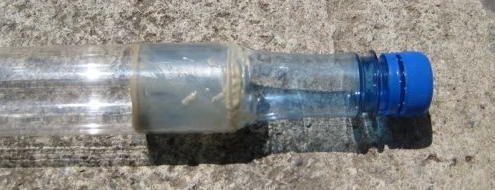
It only remains to glue the two ends into the tube. The ideal glue for this is PL Premium, but it is only found in the United States and I have not found any reseller who ships it to Europe. So either we know someone in the United States who wants to buy it and send it, or we know someone who is going to make a trip there and who can bring some back in his suitcases, or we use another one. glue. In the latter case, the one that comes closest to the PL Premium is the Sikaflex 11 FC, which is quite easy to find in any DIY store. It is a tube glue like silicone gaskets and requires the use of a "gun", as shown in the photo.
Use sandpaper on the inside of the tube and the outside of the end to make them a little rough, put the glue inside the tube and spread it well over the entire surface to be glued, but without excess. Push the end into the tube and eventually remove the excess glue, inside the tube, with a stick. Wait at least 24 hours before pressurizing.
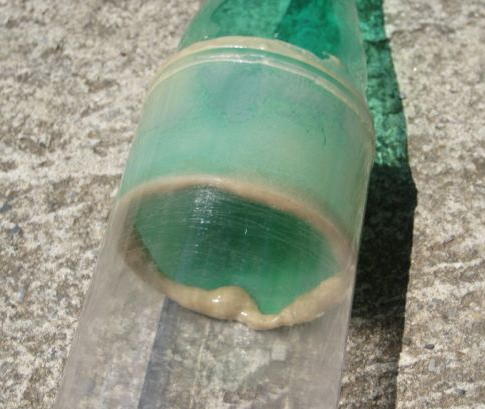
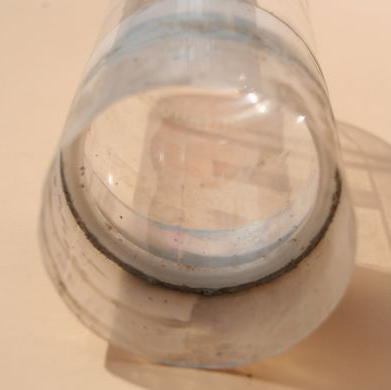
On a T17 tube, the nozzle is glued here with PL Premium. Note the bead of glue which provides a good seal.
And the cap is also glued with PL Premium.
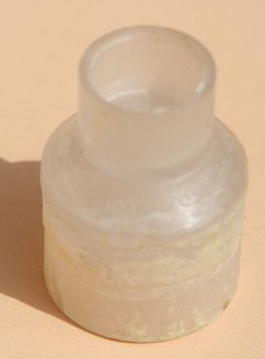
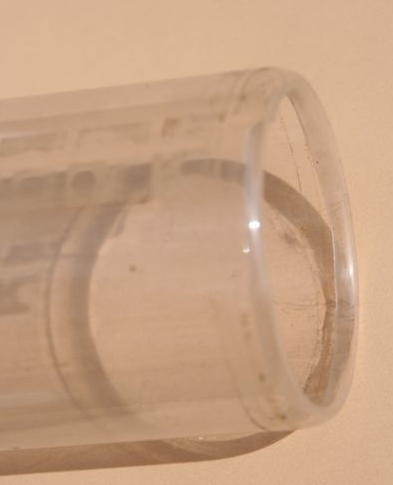
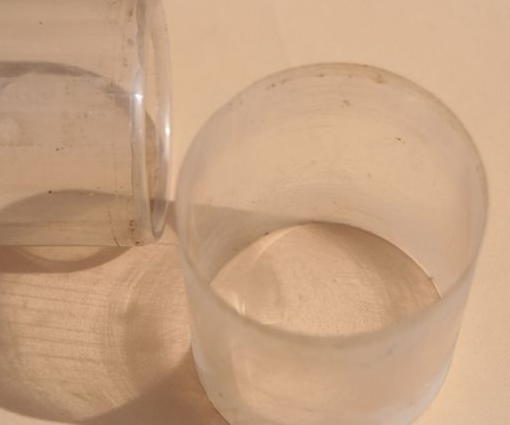
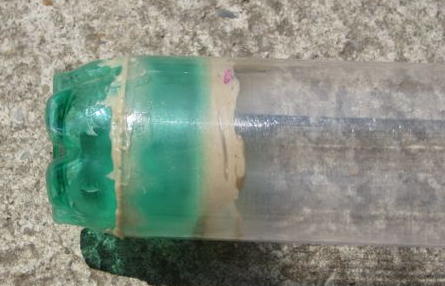
On a T12 tube, the stopper and the nozzle are made from 33 cl Quezac bottles. Here the top part with the cap on the neck, but the bottom part which constitutes the nozzle is identical (except for the cap).
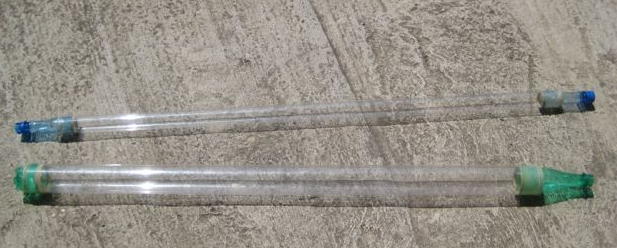
Here are two tanks, a T12 (above) and a T17 completed.
From machined parts
The tubes being polycarbonate, why not make polycarbonate ends too?
The interest lies in the collage. Indeed, polycarbonate sticks very well with Methylene Chloride. In fact we should say soda very well because Methylene Chloride is a solvent for the polycarbonate, so by coating the 2 parts to be bonded with methylene chloride, the polycarbonate dissolves on the surface and re-hardens when the solvent has dissolved. evaporated. As Methylene Chloride is very volatile, bonding is almost instantaneous. It is also necessary to act very quickly to assemble the two parts, under penalty of having a non-uniform bonding with the risk of leaks, and this is the main difficulty.
Of course, to make these polycarbonate parts, you need a lathe and the raw material, a polycarbonate bar (which is not given). So I made ends for a T12 tube, here are the plans:
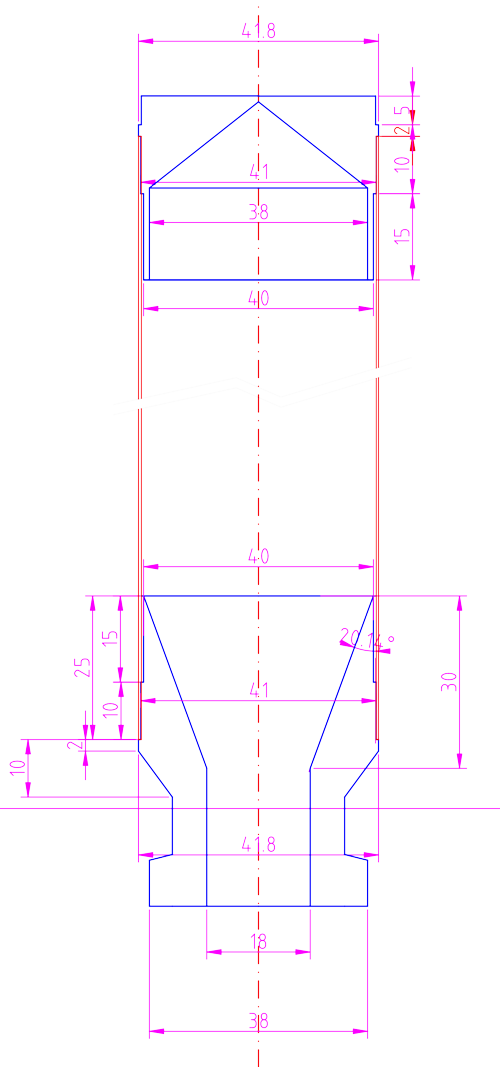
You can notice on the nozzle, on the upper part, a double recess.
Indeed to overcome the problem of risk of leakage due to non-homogeneous
bonding with methylene chloride, I do a double bonding. Most inside the
tube I put SIKAFLEX 11 FC which ensures the seal and for that I leave
0.5 mm between the nozzle and the tube. On the other hand, the part at
the end of the tube is exactly the inside diameter of the tube (41 mm)
and it is this part which will be glued with methylene chloride
We obviously find the same principle on the top part. Then a part
machined at 40 mm in diameter over a length of 15 mm for Sikaflex
bonding, then a part 10 mm long and 41 mm in diameter for bonding with
methylene chloride then a stop for the tube.
On the cap we also have 5 mm with a diameter of 41 mm to fix the payload part.
On the nozzle, there is a collar at the bottom for the launcher retaining system.
This solution is not very interesting, first it costs much more, then it is heavier and requires machining on a lathe which not everyone necessarily has. In addition, the bonding with methylene chloride, if it is very powerful, is not very easy because of the very high volatility of this product (it even evaporates from its closed bottle), the time to coat a part to glue, the other has already dried.
Here is the photo of a cap made of polycarbonate. The top of this cap is a little different from the plan opposite to adapt to the part located above.