Beginning with water rockets
Before addressing the different techniques, let's start by achieving a first rocket and launch with minimal work.
What is a water rocket ?
Briefly, because all will be detail above in this site.
we take a bottle of soda (mineral water or soda) that one fills one third of water approximately. Then, by a device that will be studied further , we put pressure in the bottle using a bicycle pump. When we will release the bottle, the air pressure will eject water and thus propel the bottle (you will learn more on the page "Propulsion" ). However, as when we inflate a toy balloon and we release it, the bottle may go in all directions. So to have a more straight flight, let's do as for the arrows of an arc, i.e. tapering and lester forward then put a tail on the back.
It is also very interesting to experience to launch a bottle without fins , and then with fins. The result is quite spectacular, especially if there is a little bit of wind.
So to begin, we propose to make the rocket below
The needed tools
All the basic equipment required for the construction of a water rocket is simple to obtain:
- A pump (a foot model is advised for comfort and, if possible, with a manometer).
- A cutter ;
- Strong ruber band ;
- neoprene glue.
- You will also need a valve bike, a cork, a small board of wood and 4 large screws to make a simple system pressure.
Finally, don't forget to bring your imagination.
The necessary materials
The really indispensable element for designing a water rocket is its main tank: a bottle of carbonated beverage in PET (Polyethylene Tetraphtalate). Be sure to take only not damaged bottles, at least for the tank, indeed these bottles are planned to keep strong pressure (10 bars/145 psi), but if they are scratched or cabosees, their holding in pressure degrades much and there is risk of explosion, even at low pressure.
Materials commonly used to make fins are balsa wood (exotic light wood used in modelling), strong cardboard, plastic panels (Akylux) or PET.
For the nose cone, the top of a second bottle will be perfect in a first time.
Preparation of the various elements
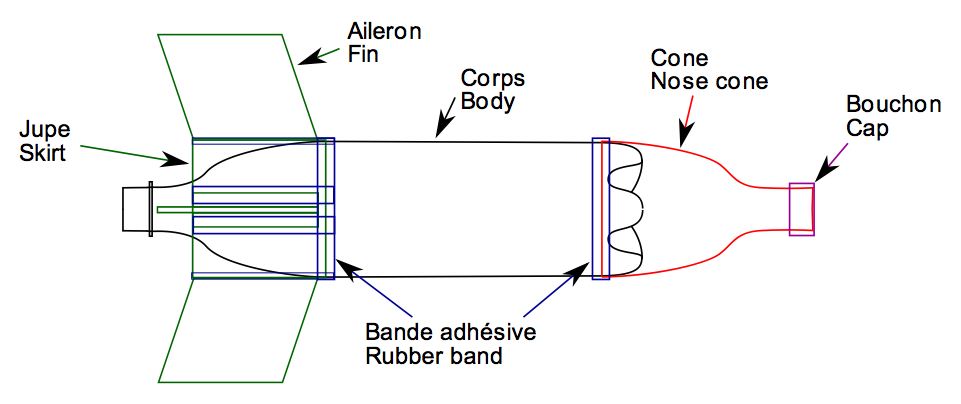
Our gear will be made of:
- a tank, with a non damaged, PET bottle whose neck will serve as the rocket nozzle.
- a cone for an aerodynamic best.
- a tail, consisting itself in 3 or 4 fins, to ensure the stability of the craft.
For the tank, it's simple, there's nothing to do.
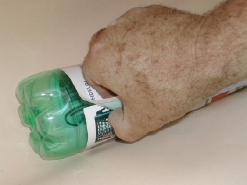
For the cone, there are many solutions to make, but for this first achievement, laughing matter to take the top of another bottle (which may be slightly damaged it). To do this, wrap a sheet of paper around the body of the bottle making sure that the edges perpendicular to the axis of the cylinder are well aligned as shown in the picture below.
There is then a perfect cylinder. Keep the foil wrapped with duct tape, we can then draw a line of cut on the bottle or cut directly along the sheet with a cutter. Attention, the cutters that cut, and not only the bottles. For my part, I do multiple passes, a first for "the furrow" then I switches back into this Groove by pressing a little harder (but not too much anyway) on each pass.
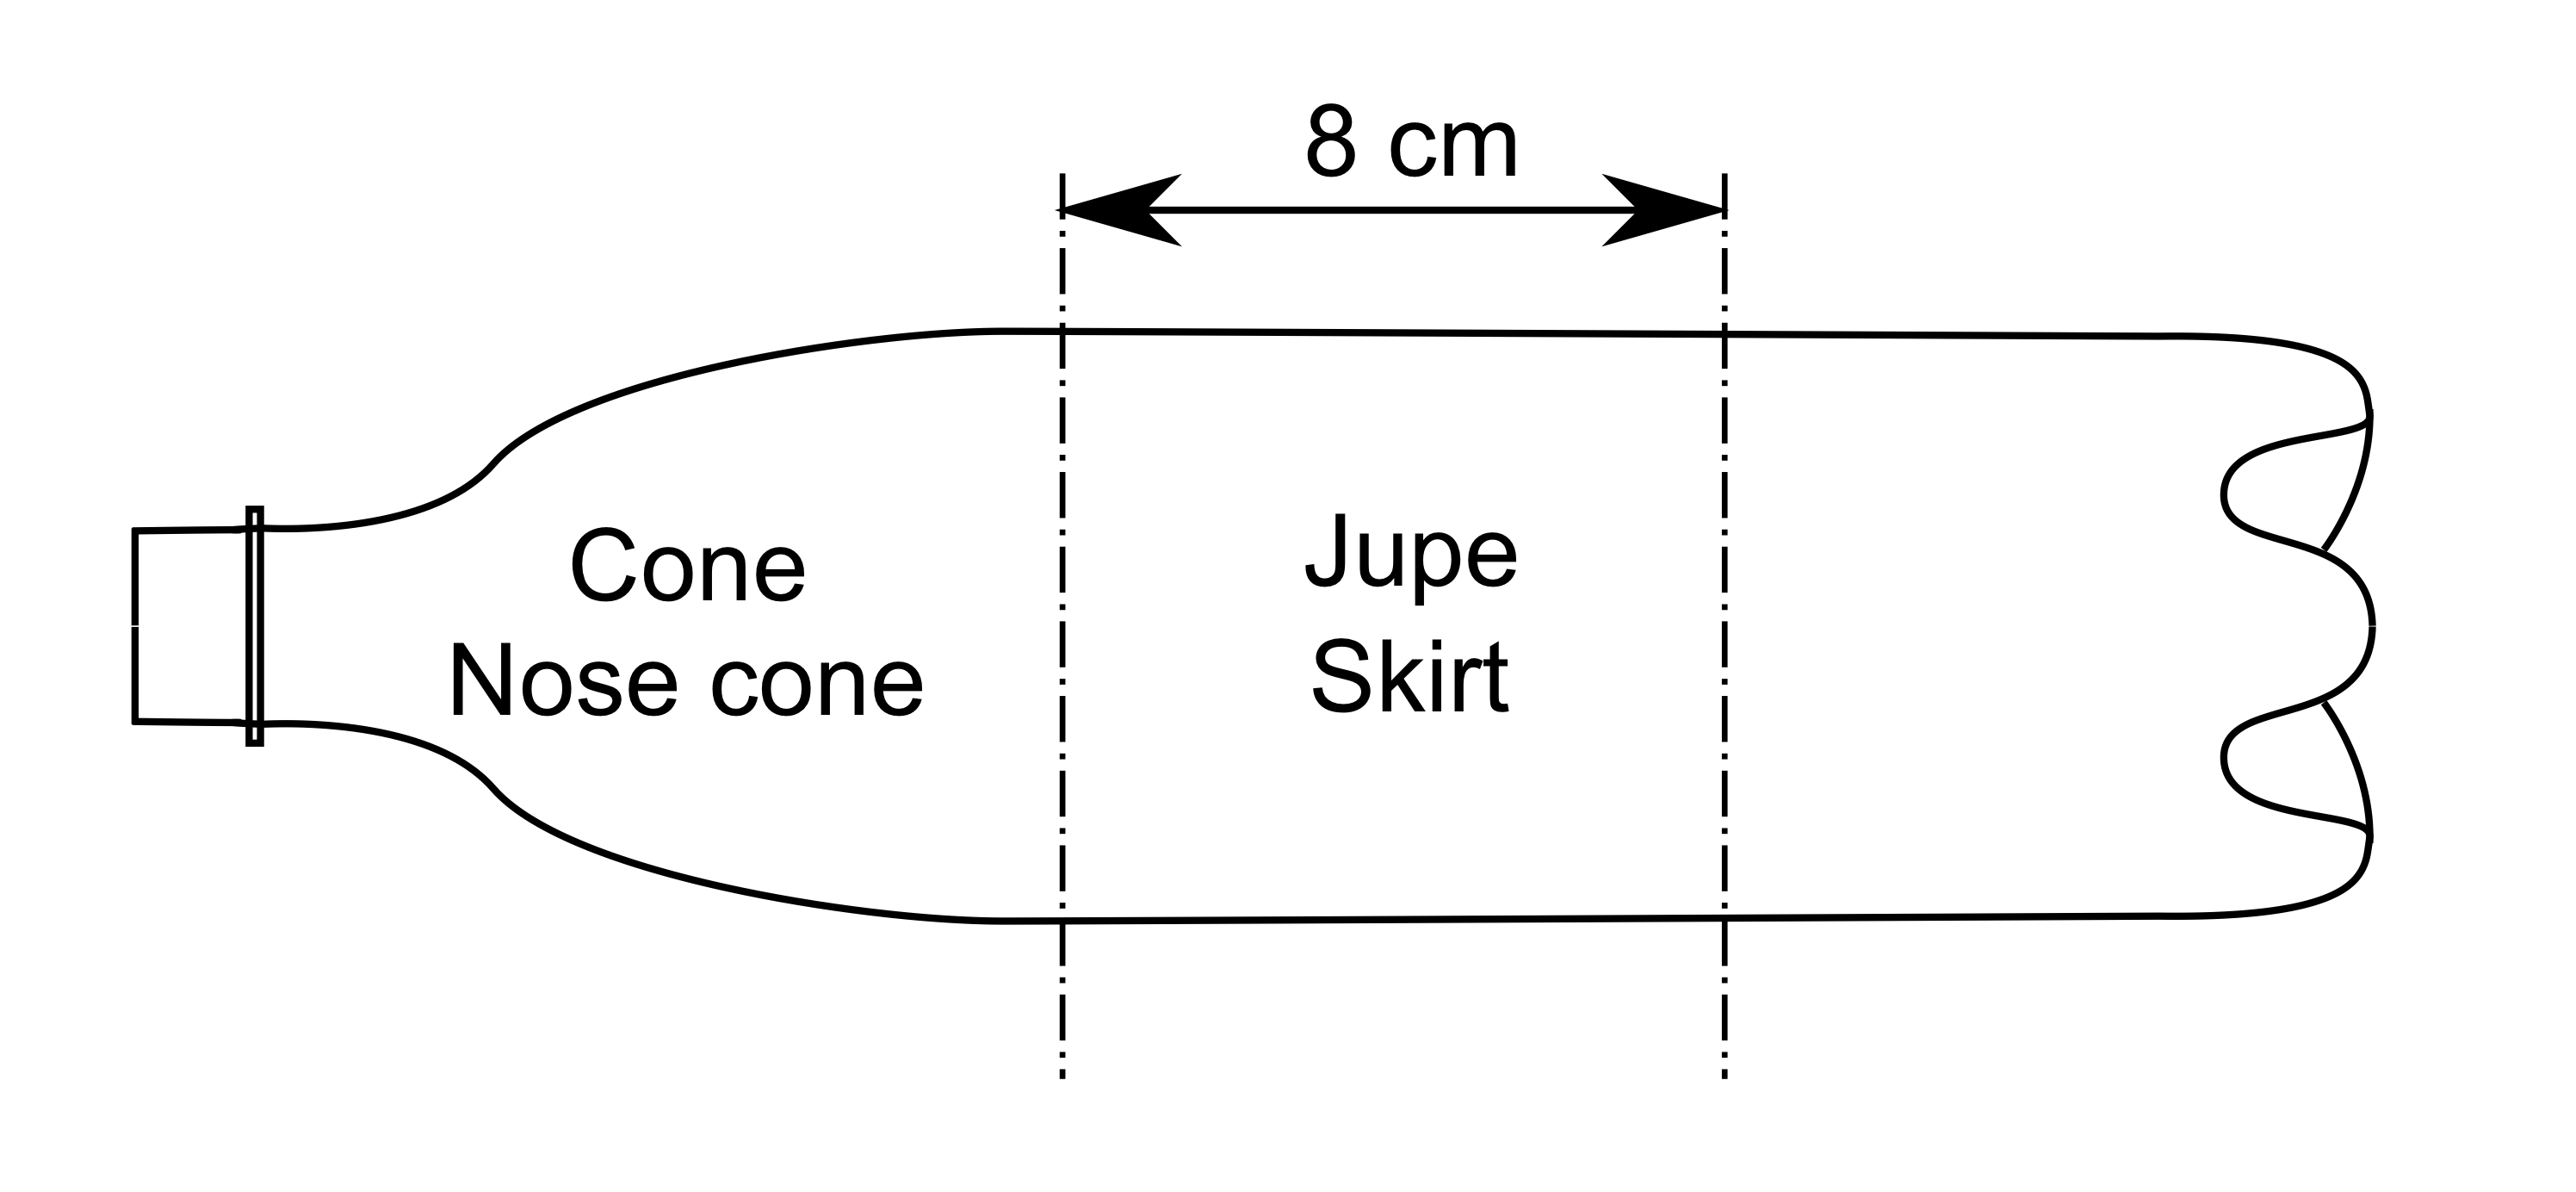
While we are in the cuts, we can take the opportunity to cut in what remains of the bottle, a cylinder about 8 cm (3") high which will serve as a skirt for the fins. Indeed, the fins must be as low as possible on the rocket, so closest to the neck, however it is often the more rounded part of the bottle and it is difficult to glue fins. Then we ruse by putting a cylinder on which it will be much easier to attach fins around the neck of the bottle.
The figure below summarizes the two cuts to make.
To achieve the fins, it exist also many possibilities, which will be
described later, but we see here only the realization from PET. First it
will recover from a bottle, a sheet of PET. Take a more cylindrical
bottle possible.
First of all, we have to recover a sheet of PET from a bottle. Take a
more cylindrical bottle possible.
Soft drinks manufacturers have more and more imagination to make us buy
their product rather than their competitor and they feel obliged for
this to do tortuous bottles which are unusable for water rockets.
Thus choose a good bottle, that we will cut, with the same method as
above, but at the boundaries of the rectilinear part of the bottle.
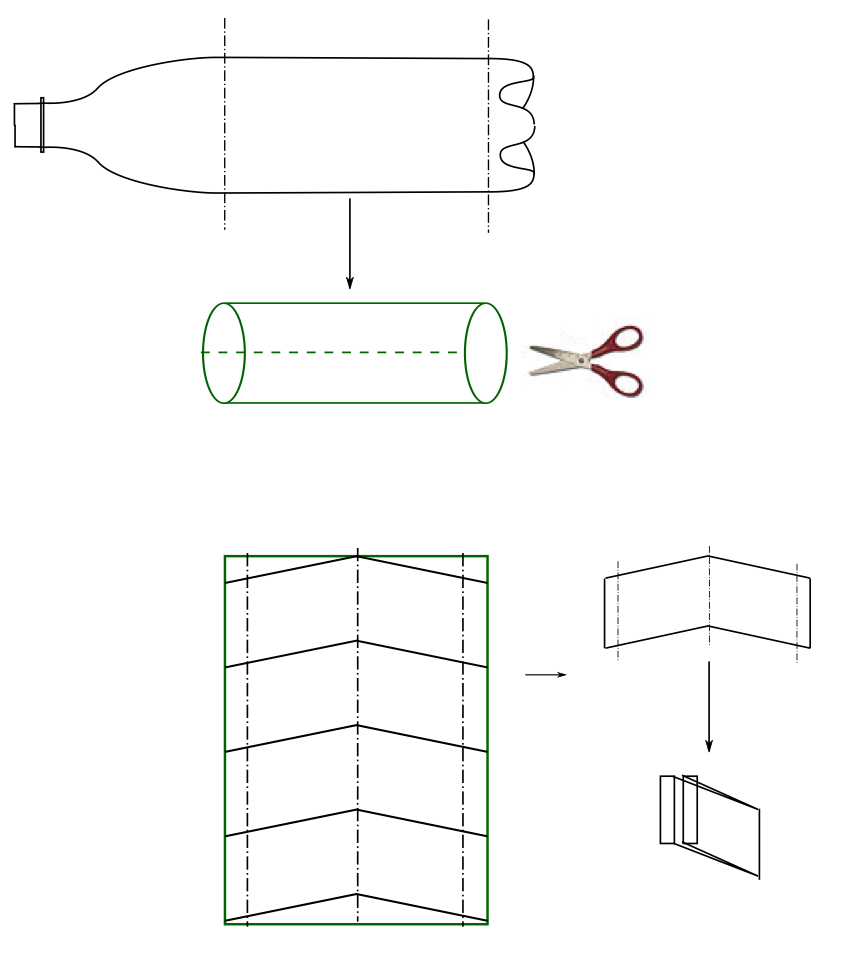
We then get a plastic cylinder that simply cut to a generator (straight line parallel to the axis of the cylinder) to get a rectangular sheet of plastic.
This sheet is very curved, we have to fold it in half lengthwise to remove the effects of these curvatures. Fins will be therefore consisting of two sides, folded one over the other and kept together by adhesive tape. It will spare both sides of small bands bent at 90 ° in the opposite direction to allow bonding to the skirt.
The figure below shows the stages of realization.
Assembly of the various components
Once the fins cut, folded and assembled (adhesive tape on the top and bottom edges), we have to stick them on the skirt. In this example we have 4 fins, it comes to arrange them at 90 ° to its two neighbours. The Assembly will always be with the tape through the two folds of each side.
Skirt will then be implemented and also glued with adhesive tape, then it will be the turn of the nosecone to be arranged and fixed by the same means.
Making the launch pad
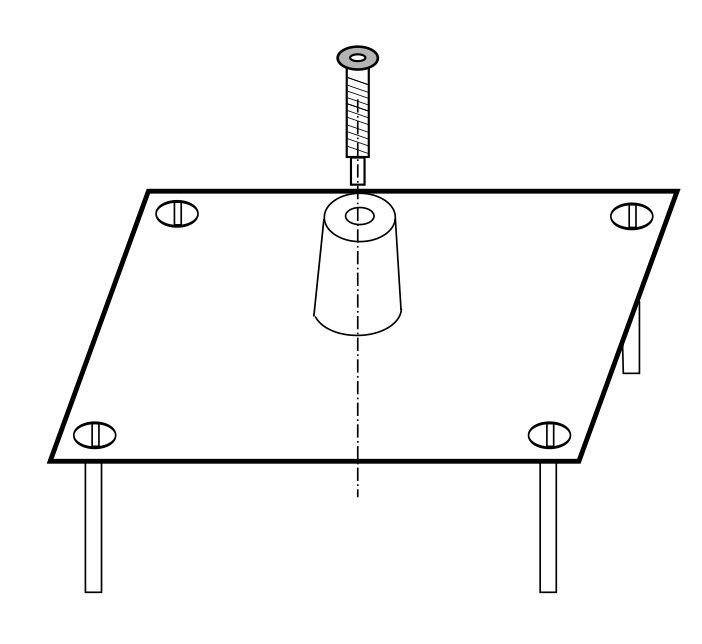
In a first time, we will confine ourselves to a very summary launch pad. It consists of a stopper made of cork or rubber bore in the middle in which will be placed a bike valve. This plug should be of sufficient size to return in force to the neck of the bottle. The plug will be stuck on a Clipboard in plywood about 20 x 20 cm (about 8" x 8"). In the four corners of this lath, we will put 4 long screws which will serve as a foot in our launch pad. this feet must be long enough to plug the pump connector into the valve and allow to plant the 4 feet into the ground for a modicum of stability. The ideal is to take 4 pieces of threaded rod of 5 or 6 mm (2") in diameter and 20 cm (8") long.
The sketch below describes this minimalist achievement :
The first launch
We made a rocket first and directed a launch pad, it only remains to launch the rocket.
Up to now, the activity did not present much danger, but now serious things begin. The dangers are many: explosion of the bottle during inflation, people on the trajectory of the rocket take-off or landing.
So here is first a few simple rules to follow (and enforce) to reduce the risks :
- Choose a large enough and clear field so the trickle down of the rocket can be out of reach of persons and goods.
- Slightly tilt the ramp into the wind (around 80 °).
- As soon as the rocket is ready to be put into pressure, place all those present behind the ramp, at least 10 m from it.
- Only the "pumper" will be near the rocket, without ever having any part of the body above the rocket, it is very, very important, especially with this launch pad, with which we absolutely don't control the departure. When the pressure is sufficient to beat the friction on the CAP, the rocket leaves without warning.
- Early pressurisation, all attendees must be standing and must watch continuously the rocket in order to follow during its trajectory and be able to go away quickly if the rocket falls towards people.
These recommendations done, the first thing to do is to choose a field unobstructed and large enough. For the rocket that we have achieved and under a reasonable pressure not exceeding 5 bars (75 psi), a field about the size of a football (or rugby) Stadium is perfect. Ensure that the owner of the premises would agree to let do this activity.
Here is a diagram summarizing the desirable characteristics of the field :
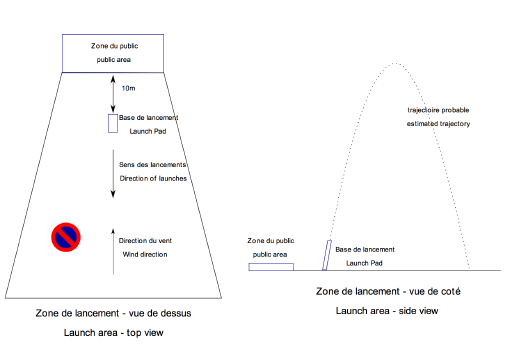
Afterwards, we will need to install the launch pad as shown above, inclined upwind and well-anchored to the ground to avoid that it topples unexpectedly.
We will mark ground limit of spectators at 10 m (30 feet) behind the
ramp. The equipment will be also stored in this area.
Close to the ramp there will therefore have found only the pump, the
rocket, first filled with a third of water and the person who pumps.
Then we can put the rocket on the launch pad, well inserted into the
cork.
From there, everyone must be extremely vigilant. The inflate process
can begin. After a while, the rocket will go. Never let anyone run
recover the rocket until it was on the ground.
Made some launch this way, but please, go quickly to the realization of a safer launch pad, in particular to control the take-off. You will find on this site a lot of indications to build a good launch pad without breaking the Bank.
Organization of a campaign launches
The preparation
As we have just seen, a launch campaign should not leave room for improvisation.
First you must choose a place that must be in relation to the possible
performance of rockets that will be launched. For rockets made with a
simple bottle and inflated to 5 bars maximum , a football (or rugby)
field will be enough. Of course, we have to obtain prior permission of
the owner of the land (municipality, farmer, particular). According to
the remote access in this field, should take into account all the
constraints of transport (logistics, time and insurance).
Depending on the number of participants in this campaign, the framework
should be to ensure a "order service" required rigorous, as well as
equipment (stakes, broadband construction, plaster) to materialize
different areas of launch pad. We must also think that at the end of the
campaign, the land must be returned to its owner in the same State they
arrived, so provide trash bags.
Of course, we must provide all the material necessary for launches, to know :
The indispensable :
- The rockets
- One (or better several) launcher(s) to launch with its tent pegs to secure it on the ground and his string of 10 m for release.
- One (or better several) pump(s)
- Water, if there is no on-site (cans, bottles, funnel, fill on ramp device if applicable).
The desirable :
- A case of repair rocket with cutter, scissors, cloths, adhesive tape, fins, bottles empty, ballast.
- A case of repair launch pad (key, screwdriver, pliers, pipes, collars).
- Something to note for each launch, time, conditions (percentage of filling, pressure, angle) and the result.
- A plywood Board with paper set to the Clipboard by pliers will do the trick.
- A windsock or any device for determining the direction of the wind.
- A theodolite to assess reached altitude.
The small more :
- a camera.
For each launch, the timeline could be as follows (to be obviously adapted to the circumstances) :
- Designate a script that should be noted all the features of the launch.
- Establishment of the rocket on the launch pad (filled with water or not depending on whether a device for water filling is planned or not).
- Locking of the rocket.
- Folding of the parachute and closure of the cone (if applicable).
- Water filling (if it isn't already done), and then note the amount introduced.
- Take a picture (optional).
- Return all spectators in the area provided.
- Connect the pump and proceed with pressurisation (to advertising pressure).
- Start the countdown and at zero, activate the release string.
- Follow the rocket until arrival at the ground and then record the results.
- Retrieve and store the rocket.


