The Tail
The problem
The role of the tail (set of fins) is to ensure the stability of the rocket, by ensuring that the center of pressure (CoP) is below the center of gravity (CoG), at a distance equal to minus a diameter of the rocket. For an explanation, see the rocket Stability page.
To "lower" the center of pressure, we can act on the surface of the fins and their position in relation to the center of gravity. The lower the fins, the less surface area required.
Minimizing the area of the fins is important because if they improve the stability of the rocket, the fins have a detrimental influence on the performance since they increase the weight, the coefficient of drag and the surface offered to the air resistance. All these considerations must therefore be taken into account to design good fins.
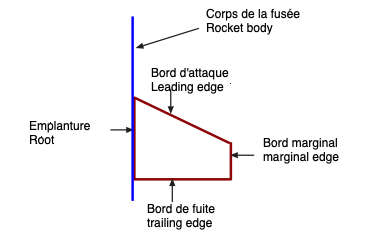
The different parts of a fins
A first question to be settled concerns the number of fins. In practice the choice comes down to 3 arranged at 120 ° or 4 arranged at 90 °.
Then, what form should they be given? The figure below gives the most common shapes, but it is not limiting.
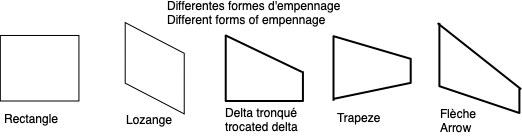
For this type of rocket, it does not seem that the shape is of great importance, however common use tends to favor the truncated delta shape with a length of root close to 1 diameter and an angle between the root and the leading edge between 60 ° and 70 °.
The fin's position will always be as low as possible.
The Materials
As seen previously, a number of materials can be used for the fins.
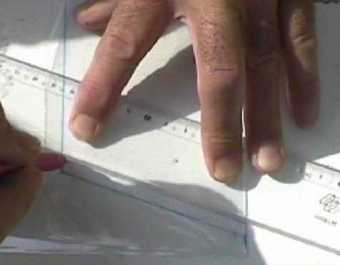
Strong cardboard, balsa, akilux or plastic sheets (PVC or Nylon) are quite easy to cut with a sharp cutter (be careful with your fingers). Always use a metal ruler (or better a 15x15 angle iron) to guide the cutter without risk to the fingers.
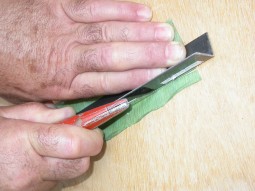
Using an angle iron for cutting with a cutter
Bristol board or PET take a little more work since they have to be folded and glued to get stiff, flat fins. For card stock, it is a question of giving it more rigidity and for PET it is necessary to compensate on the one hand for its lack of rigidity and on the other hand its natural curvature.
Each fin is therefore made up of two identical faces glued together. These two sides will be cut in one piece, ensuring that they are joined by the leading edge (figure below) and we will take the opportunity to add 2 adhesive strips at the root.
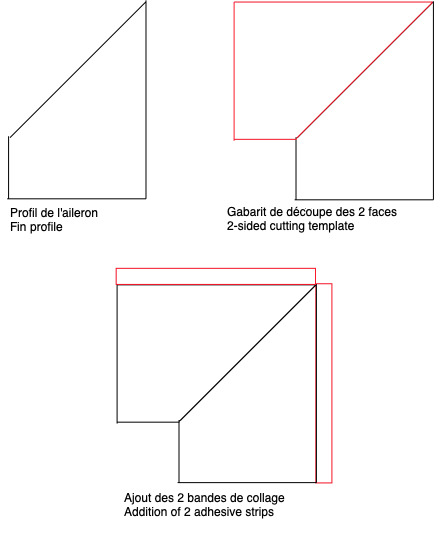
Cutting a fin
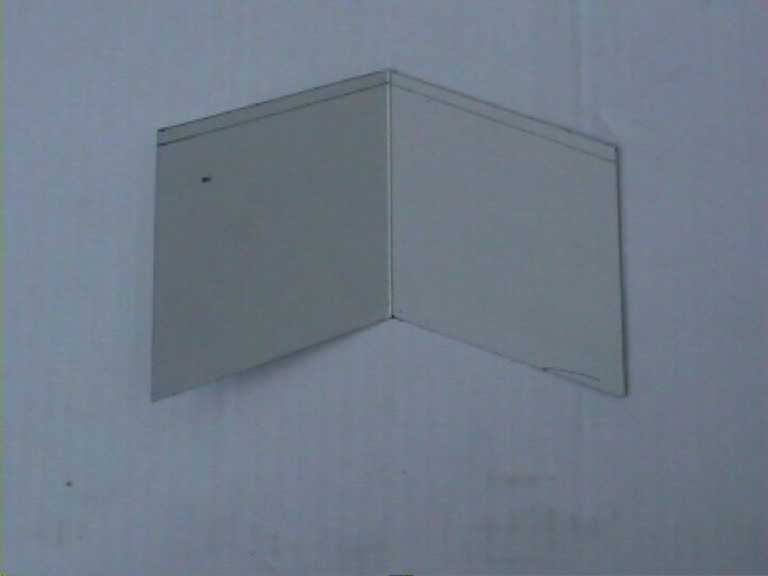
Example of a PET fin
To improve the performance of my rockets, I abandoned cardboard in favor of PET plastic recovered from bottles.
These fins are much lighter and stronger, but the realization is a little more complicated. They consist of a folded and glued PET sheet. This is because the plastic cut from a bottle is strongly curved, so by folding it and gluing the two parts together, it gives a flat whole.
Here are the steps:
|
Make a template made up of twice the profile of the aileron, joined by the leading edge. Without forgetting the flaps, on the root side, which will allow the fin to be glued to the fuselage of the rocket or the skirt. You can also trace directly on the plastic sheet, but its curvature does not make it easy to trace. |
 |
|
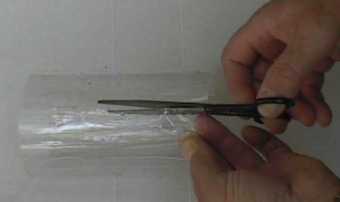
Cut the central cylindrical part out of a bottle, then split the cylinder thus obtained, as opposite, to obtain a rectangular sheet. |
 |
|
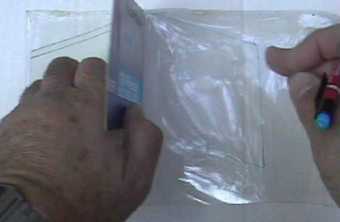
Using the template, trace the outline of each fin on the plastic, positioning the leading edge on the fold. Make sure that the bend is either on a generatrix of the cylinder formed by the piece of plastic, or perpendicular to a generator. This makes it possible to have the two parts of the fin with the same curvature but in opposite directions, which means that after gluing the whole will be flat. |
 |
| |
 |
|
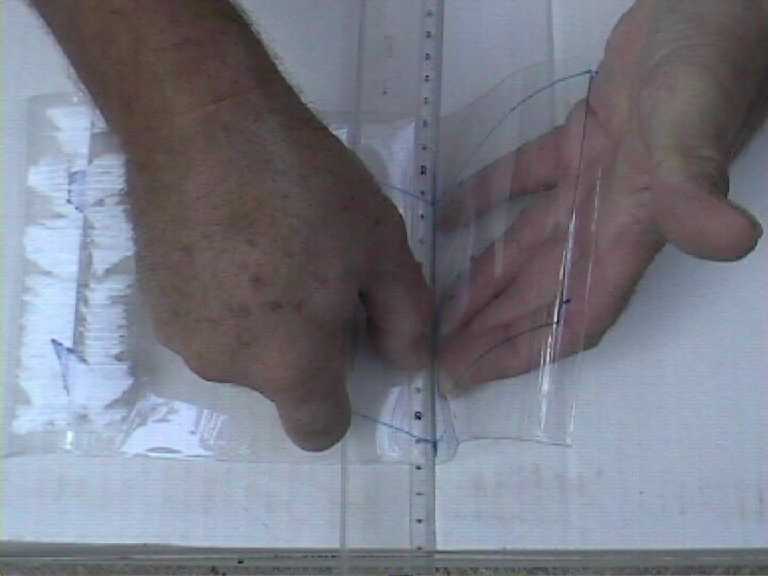
Fold the PET sheet along the leading edge. By using a triple-decimeter, or any other flat ruler, we easily obtain a neat fold. |
 |
|
Glue the two parts with cyanolite. Be careful, however, not to glue the two flaps for fixing the ailerons to the fuselage. For this, I fold these two flaps before gluing. In the photo, one side of the fin is glued. You can also just stick the trailing edge and the salmon with duct tape. |
 |
|
The two parts are then folded one on the other, it is necessary to pass quickly the hand above to distribute the glue well everywhere. This step only concerns the cyanolite bonding, of course. |
 |
|
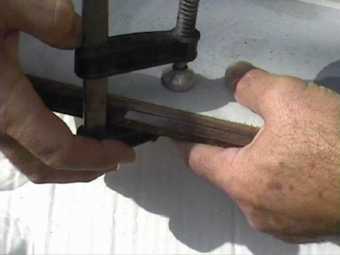
The fin is then strongly pressed between two boards and using clamps. The flaps are on the outside and folded up, so that they cannot be stuck together. This step also concerns only the cyanolite bonding. |
 |
|
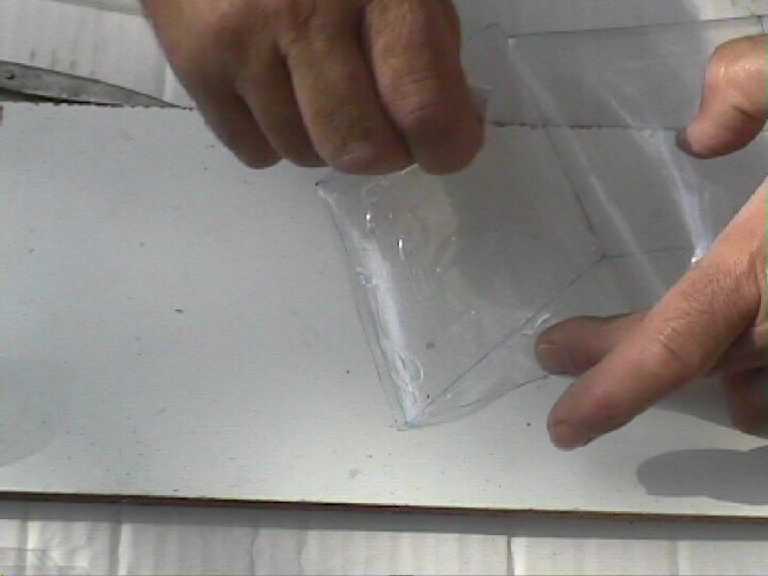
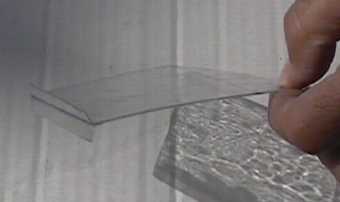
Cut the fins according to the outline previously made. The photo shows us a finished fin. It now remains to glue the fins on the fuselage. |
 |
Gluing the ailerons on the rocket
Two bonding methods, directly on the body of the rocket or on the skirt.
The diagrams below show:
On the left a direct gluing on the tank, which has the advantage of simplicity, but does not allow to position the fins as low as one would like, and according to the shape of the bottle, the shape of the root can be complicated.
On the right, a gluing on a skirt (in red). The skirt is a PET cylinder cut from another bottle, on which the fins are attached. The root here is straight, so easy to make and the gluing is relatively simple. The positioning of the fins is easy, you just need to make a more or less long skirt (one can even consider a tail unit exclusively made up of a skirt placed much lower than the nozzle and held by three or four spars). Disadvantages of this type of assembly: it is heavier and less aerodynamic than the previous one.
Fin fixing without or with skirt
Positioning
The gluing of the fins is quite delicate. They must indeed hold securely or they will be torn off during takeoff, and they must be well positioned for efficient guidance.
Well positioned fins, that means all at the same height and then distributed evenly around the rocket (i.e. at 120 ° to each other in the case of 3 fins or at 90 ° in the case of of 4).
In order for all the fins to be at the same height, you have to draw a line around the bottle (or the skirt) corresponding to the top of the root.
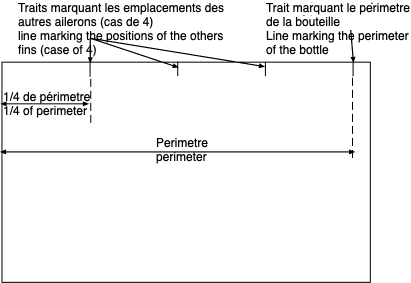
To evenly distribute the fins around the rocket, mark the location of the first fin. Its position does not really matter, however its root must be well parallel to the axis of the rocket. We will therefore use an angle iron to trace this first position. For the positions of the other fins, proceed as follows:
Using a sheet of paper as if to draw a cut line, measure the exact perimeter of the bottle by marking where the sheet overlaps. Remove the paper, then measure the perimeter.
Divide this perimeter by 3 or 4 depending on the number of fins and transfer this value to the edge of the sheet as indicated below
Measuring the space between fins
Then put the sheet back in place on the bottle by aligning the first edge of the sheet with the trace of the position of the first fin and transfer the locations of the other fins on the bottle. Using the angle iron, complete the root mark for each fin.
Now it's time to glue the fins to the bottle or the skirt.
First which glue to choose ?
Few glues are really effective on PET.
Polyurethane glues (Sikaflex 11 FC for example) adhere quite well, unfortunately they have a rather long setting time, requiring a whole assembly to keep the fins in place on the rocket during drying. In addition, they are expensive and not recommended for health.
Cyanoacrylates (like Super glue, cyanolite, etc.), if they do not offer equivalent adhesion, have the advantage of having a very short setting time, but be careful of finger sticking.
Neoprene glues have good adhesive power and fast setting. They undoubtedly constitute one of the best compromises.
Epoxy glues also have decent adhesive power, but the setting times are long. Fast epoxy adhesives have been around for some time, but the setting time is still a few minutes longer and it seems that their adhesive power is not as good as the others.
Pistocolles, NEVER USE ON A TANK. The hot glue deforms the PET and can even make holes, therefore absolutely to be avoided on the parts which will be under pressure.
They can be used to glue the fins (if they are not PET) to a skirt, before placing it on the tank.
Regardless of the glue chosen, the precaution must be taken to pass a little sandpaper on the parts to be glued and to degrease them well.
If the fins must be glued directly to the tank, it is preferable to choose a quick-setting glue (neoprene or cyanoacrilate). This bonding will be reinforced by the addition of an adhesive strip on either side of each fin.
It is always possible to glue the fins to the tank with a long-drying glue, but in this case it will be necessary to provide a whole assembly to keep the fins in place on the tank. This will be inflated beforehand (2 or 3 bars are enough) to make it rigid
The photos below show what I made from the packing boxes. The fins were made of strong cardboard (cut from a wall calendar).
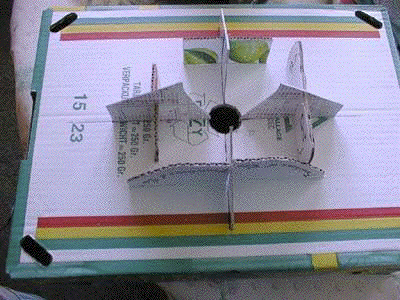 |
The base cardboard is cut to provide a place for the bottle cap and 4 places for the fins. Small cardboard boxes glued vertically hold the fins in place. All that remains is to glue the fins and place the bottle in the center. It will be noted that in this example the shape of the root is complicated, but corresponds to the profile of the top of the bottle. |
 |
After gluing the fins, the bottle is inserted. The sheet of paper glued to the bottle is used to check the alignment of the fins. If necessary, we will have taken the precausion to fill the bottle with water to gain weight and to inflate it slightly (2 or 3 bars). |
Gluing the fins to a skirt is generally easier.
First you have to cut a skirt in the cylindrical part of a bottle identical to the tank. The height of this cylinder will be at least equal to the dimension of the root. Be careful, however, not to make it too long, it could interfere with ramping up.
Before cutting this cylinder, do not forget to trace the locations of the fins, it is easier to trace on a bottle (see method above), if possible slightly inflated, than on a very soft PET cylinder.
Leave about 1cm free at the top of the cylinder to facilitate gluing on the rocket, using adhesive tape.
Prefer fast-setting glues, in particular neoprene glues, and the bonding will be reinforced with an adhesive strip on each side. Don't put tons of duct tape, it just makes the rocket heavier, but use good quality.
The fins with flaps like those described above have a larger bonding surface and the installation of adhesive tape is done "flat" therefore more easily.
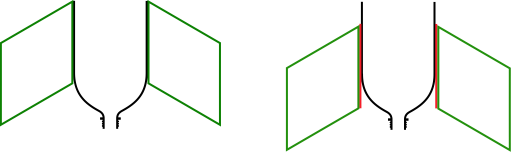
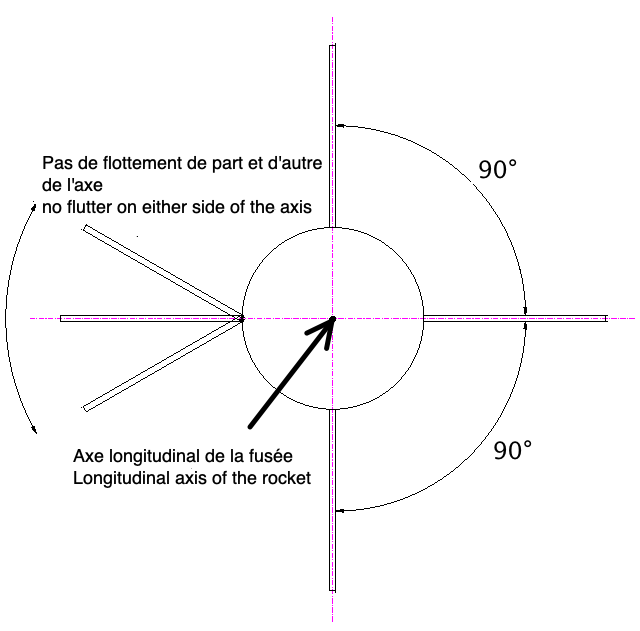
It is also necessary to ensure that the ailerons do not "float", that is to say that they remain in a plane passing through the axis of the rocket. In other words, each aileron of the empennage must remain firmly at an angle of 90 ° (for 4 ailerons and 120 ° for 3) to the adjacent ailerons.
The drawing below shows the positioning of the ailerons (case of 4 ailerons), but on the left it shows what should not be done.
The photo below shows an achievement. The fins are in "akilux", they are glued with white Sikaflex 11FC plus glass fiber reinforced adhesive tape.
The installation of the duct tape is a little complicated when there are no flaps like here.
Glue half of the tape on the fin and completely fold over the non-glued part. Position the fin in its place and release the adhesive tape and press it onto the skirt. For the second side of the aieron, you have to fold the tape lengthwise, the sticky part on the outside of course. Then position the sticky edge of this folded tape, as perfectly as possible, in the angle formed by the fin and the skirt. Apply each part of the adhesive tape to the fin and the skirt respectively.
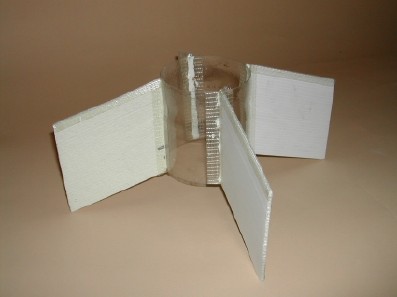
Skirt + fins set
All that remains is to fix this set on the rocket, with tape adhesive.
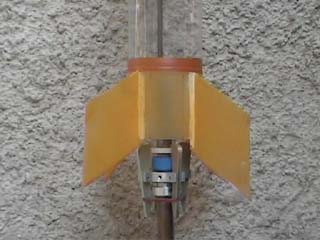
Below the tail of a 1.5 liter bottle that I painted in fluorescent orange to see it better. We can clearly see the ribbon red adhesive for attaching the skirt to the rocket. The ailerons are in PET, with flaps, glued to the skirt with white Sikaflex 11FC and duct tape (not visible in this photo).